Tuesday, September 14, 2010

Completed Dollhouse

Okay, so I've had this house completed for about 2 weeks, with the intention of posting pictures here. :) Sometimes I wonder where the hours in my days go.
Of course with the new school year, and homeschooling, we are all still adjusting to the new schedule and routine of our days, which in an of itself is a challenge :).

Somehow, the older my boys get, the harder it is to find time to do "projects"... That said, I suspect that this will be the very last dollhouse I make for a long, long time! :) It was a fun house to make however... I did enjoy it. Hope you enjoy the tour!


The sun was streaming in one morning and I thought it was pretty the effect it made on the dollhouse...


Blessedness~
Linda

Linking up to White Wednesday at Faded Charm :)

Tuesday, August 17, 2010

How I Spent My Summer...

Wow, I can't believe that summer is nearly over! Seems like just yesterday we were celebrating our last days of school and here we are next week getting ready to start school up again! But it was a great summer, however brief it seems now. We spent a lot of time together as a family, swimming, fishing, playing, working. We got to spend precious time with family and friends from long ago and in between all that, I worked on this.

A Barbie doll house.

I'm happy to say that this is almost completed. I've got a little more work to do on the interior and I have to finish up the exterior trim work. This house ended up taking me a little more time than they normally take to build. Partly because of the "demands" of summer, and partly because I did a little more to this house than I normally do to the houses. Scrolling fretwork, fretwork and more fretwork! Every house I build I try to make unique from all the others. And since I've decided that this is more than likely the very last house I will build of this size, I wanted to go all out. What do you think?

This is the dining room.


The living room and the front entry door.


The kitchen.


Another view of the kitchen. I made a little refrigerator that sits in there next to the sink, but the paint is drying today on it, so it is not in the photos. I also have a little valance that matches the sink.

The tiny Bath

A white bedroom with a pretty "french door" that opens up to Barbie's balcony.


And another little bedroom.


Hope you enjoyed the tour... I'll have the exterior photos up soon!

Blessedness~
Linda

I'm linking up with Get your Craft on Thursday, White Wednesday and Show and Tell Friday! Thank you ladies!!

Monday, July 12, 2010

Barbie's New Home Update

I thought I'd share a few more pictures of the dollhouse in process today. With summer activities, it's a little harder to find the time to work on the house, but I'm making progress... steady but slow :)


This is the living room ceiling. I had a better picture, but for some reason this morning my computer doesn't want to cooperate, so I'm not able to upload it. Hmm... maybe it's too early. Come to think of it, it very well could be that it's just too early for me and not the computer after all... ! :)


A "Hotpoint" range for Barbie, complete with a wire baking rack inside :).
I remember as a child we had an old Hotpoint electric range circa about 1926 or so. It didn't look like this. Ours had the tall cabriole legs. When my folks remodeled the very outdated kitchen, they moved the range out on the covered deck we had so that we could use it to play "house". A LOT of mud pies were cooked in that oven! When my folks sold the house 20 years later, they left the range. I wish that I'd been able to keep it. But I'm not sure what I would have done with it at college :). I've never run across another one quite like the one we had, although I see picture online of ones similar to ours.

I'll be putting the finishing touches on the little sink and refrigerator today. And then the downstairs level of the house should be completed. I have three rooms to complete on the top floor a few doors to hang and the exterior to finish up as well.

Blessedness,
Linda

Wednesday, July 7, 2010

Refreshment on a Hot summer day!

Summer it seems is officially here! Hot weather is not unusual for our part of our state. Most years in fact the hot temps begin as early as April and continue on through September... day after day we enjoy nothing but blue sunny skies! This year our spring was exceptionally cool and it actually rained all the way through May. June was blue skies, and very mild temps... again very unusual for our part of the state. But then July rolled around and with it, the extreme triple digit temps that are so typical here. Thankfully we don't have the humidity that many of you experience, but still, triple digits is still triple digits, and that is just HOT!!

I thought I'd share a few pictures today that are cool and refreshing!
These were actually taken by my brother who was visiting from out of state this past May. This is Burney Falls. Burney is a small quaint mountain town very near where we live, here in beautiful N. California.


Ah... I feel cooler already!!

Blessedness~
Linda

Saturday, July 3, 2010

Happy Independence Day Weekend!!


Good morning and Happy 4th of July weekend to all! I hope you all are enjoying a fun filled, sun soaked, gorgeous holiday weekend. I'm so very thankful for those who have sacrificially fought so that we can enjoy the freedoms that we do.
I wanted to take a minute to share with you about a giveaway happening over at SaraNorris' blogsite. For those that aren't familiar with Sara and her blog, Sara is a lover of heirloom sewing and she does the MOST beautiful work! She recently created two new children's patterns for heirloom clothing. And you can see and read all about it on her blog here
Hope you all can hop over and say hello to Sara and see her new exquisite designs!
Great job Sara!

Happy 4th everyone!!

Blessedness--
Linda

Saturday, June 26, 2010

A dollhouse in process...

I thought I'd share a few pictures of the current barbie dollhouse that I am building to sell.
This house is about half way finished. It's a 2 story house with Kitchen, dining room and living rooms on the bottom floor, 2 bedrooms and a bath on the top floor.
The pics today are of the bottom floor. I still have a lot of little details to finish up and paint touch up of course, but I think it's turning out pretty well.
This first photo is of the ceiling in the kitchen. I created a raised ceiling in here. I wanted it to look similar to the old tin ceilings that were so popular during the Victorian era.

Here's another of the kitchen. I was inspired by the come back of the board and batten wainscot. This was actually a popular wall treatment during early century house design. I personally love the way it looks, and think I have just about convinced my sweet Mr A Garden of Roses that we need to install this in OUR little cottage home! :)

This is actually the living room ceiling in the works! I am going to add a bit more trim and then give it a fresh coat of white paint!

And finally the dining room ceiling. I had too much fun making these raised designs! Who knew regular wall mud could be so much fun!! :) Wouldn't this idea be cute on a child's dresser front? Or to dress up a plain cabinet door face?

I'm thinking I'm going to have to try to make some pretty chandeliers for these rooms. My boys love electronics and are more than eager to "help" me wire this house...

That's all for now... I've got lots of exterior fancy trim pieces that I've been busy making patterns for and cutting out. But I'll share those later :)

Thanks for stopping by!

Blessedness--
Linda

Thursday, June 17, 2010

A Peek Inside...

Thank you all for you nice comments on my last post. This is actually one of several barbie houses that I've made over the years. And for those that wanted to see the inside, I can only show you pre-furnished, as I have since sold the house. You can see interior pictures, more exterior details and a few of the other houses I've made by clicking HERE

Although I never intended this blog to be about Barbie houses per se... Actually I'm still trying to figure out what EXACTLY my blog is about :). For now it's eclectic some of this and some of that, and whatever else happens to strike my fancy on any particular day!!

But since I am on the subject of dollhouses, I am currently about half way done with another that I intend to sell. This one is loaded with fancy trim work!! Am I nuts... probably. But it's worth the aching back after hours of scroll saw cutting to see the finished product on these pretty houses. Or at least I think that is what makes them truly special. Come for a visit tomorrow and I'll share a few sneak peaks at my latest work in process.
Thanks for stopping by!
Blessedness~
Linda

Tuesday, June 15, 2010

My First White Wednesday

Today I thought I'd join in the fun of White Wednesday over at Faded Charm

I'm sharing a white Barbie dollhouse that I made a few years ago, all from scratch. This is my own design.


Maybe this is more of a Barbie mansion ;)

Details... and a LOT of scroll saw work!!


Even white flowers for the plant shelves!

Details of the lower floor's bay window.

And look at this cutie!! Who is this peeking through the bay window??? I think he's actually after the throw pillows on the window seat inside ;).

I'm also linking to Get your Craft on Thursday and Funky Junk's Saturday Nite! Thank you ladies!!

Thanks for stopping by!
Blessedness--
Linda

Sunday, June 13, 2010

Kitchen Makeover Part 2

I'm going to share the second part of my ongoing kitchen makeover today. As I mentioned in my last post, for Mother's Day this year, my sweet husband announced that he was taking me to one of my most favorite places to shop!!
Lowes!! Whoo Hoo!!
Does my hubby know what makes this gal happy or what??!! I knew exactly what I wanted, so it was a very fun quick little trip!!


My Mother's Day gifts... a new LONGER hose for my air compressor!! The old one was had a leak and so my air compressor wasn't holding air :( Not good!
A tube of liquid nails... I've decided this is a MUST HAVE in all remodel projects! And 4 packages of beadboard!! How fun is this??!!

It took me two days to prime, paint and install the beadboard (of course not without help from three little people).
Here's my Mother's Day gift now!


What a difference. As you may have noticed in my "before" picture in my last post, the walls were all textured and painted over drywall. No matter how hard I tried, I could never seem to get the walls really clean. The dirt and grease and grim would get embedded in that wall texture and was impossible to wipe completely out... especially behind the stove! I had read a lot of the pros and cons of having a beadboard backsplash, and I finally decided that the pros out weighed the cons. I used a semi gloss paint on the backsplash, and I love how easy it is to wipe the beadboard clean!


I decided to wrap my beadboard into my window, and I added a cute little shelf molding at the top. I love how it looks!

Price so far for my kitchen makeover:
Beadboard on base cabinets $20
Beadboard backsplash $40
Liquid nails $2
1 Gallon Behr Semi Gloss paint $25
Electrical box extenders $5
Total cost thus far $92!!
I love that for little money my kitchen has been given such a dramatic new look!


Blessedness~
Linda

Kitchen Makeover Part 1

Okay, so a LOT of things have been going on in my household as of late! Springtime is always a busy time of year, with new projects, spring cleaning and of course oodles of yard work! A few months ago I started on what I thought was going to be a quick little kitchen makeover project... I admit, with three little boys in tow, no project is ever "quick" nor easy. So I'm sure I was being overly optimistic when I began this "quick" project.
My kitchen is on the small side, but it does face East, and I have a lot of windows on that side of the house, so in the morning I get a lot of very nice natural light. But by mid day my small kitchen was so dark it was cave-like. Seriously! Cooking dinner, for me, is depressing enough without the environment being dark and gloomy to boot! I had originally wanted to do some major renovations, but seeing that we didn't have the budget for much, I had to find other means of making over my kitchen. Here is the before shot...

I know... nothing special, builder grade cabinets, hollow core wood veneer cabinet doors and drawers, laminate countertops... ugh!
I had some primer and white paint left over from my little bathroom makeover so I set to work on painting the cabinets. Boy, what a job that was!! Don't let anyone fool you, painting kitchen cabinets is A LOT OF WORK!!!! After about 4 weeks I think I finally got the majority of my cabinets painted and primed!

This was midway through the painting, even at this stage, it was amazing how much brighter and lighter the kitchen became!
Did I mention my cabinets were base grade builder cabinets??? And did I also mention that when they laid out the kitchen cabinets they put cabinets that were meant to run up against other cabinets or walls and used them as end cabinets?? So I had plain 1/8" wood finishing off my end cabinets. Unbelievable! Not only did it look odd, but one chair falling against it, pushed by one little boy, was enough to break a nice 2 inch section of the thin wood. It was harder to notice the break in the wood when the cabinets were dark, but once they were nice and bright and white, the break was very obvious!
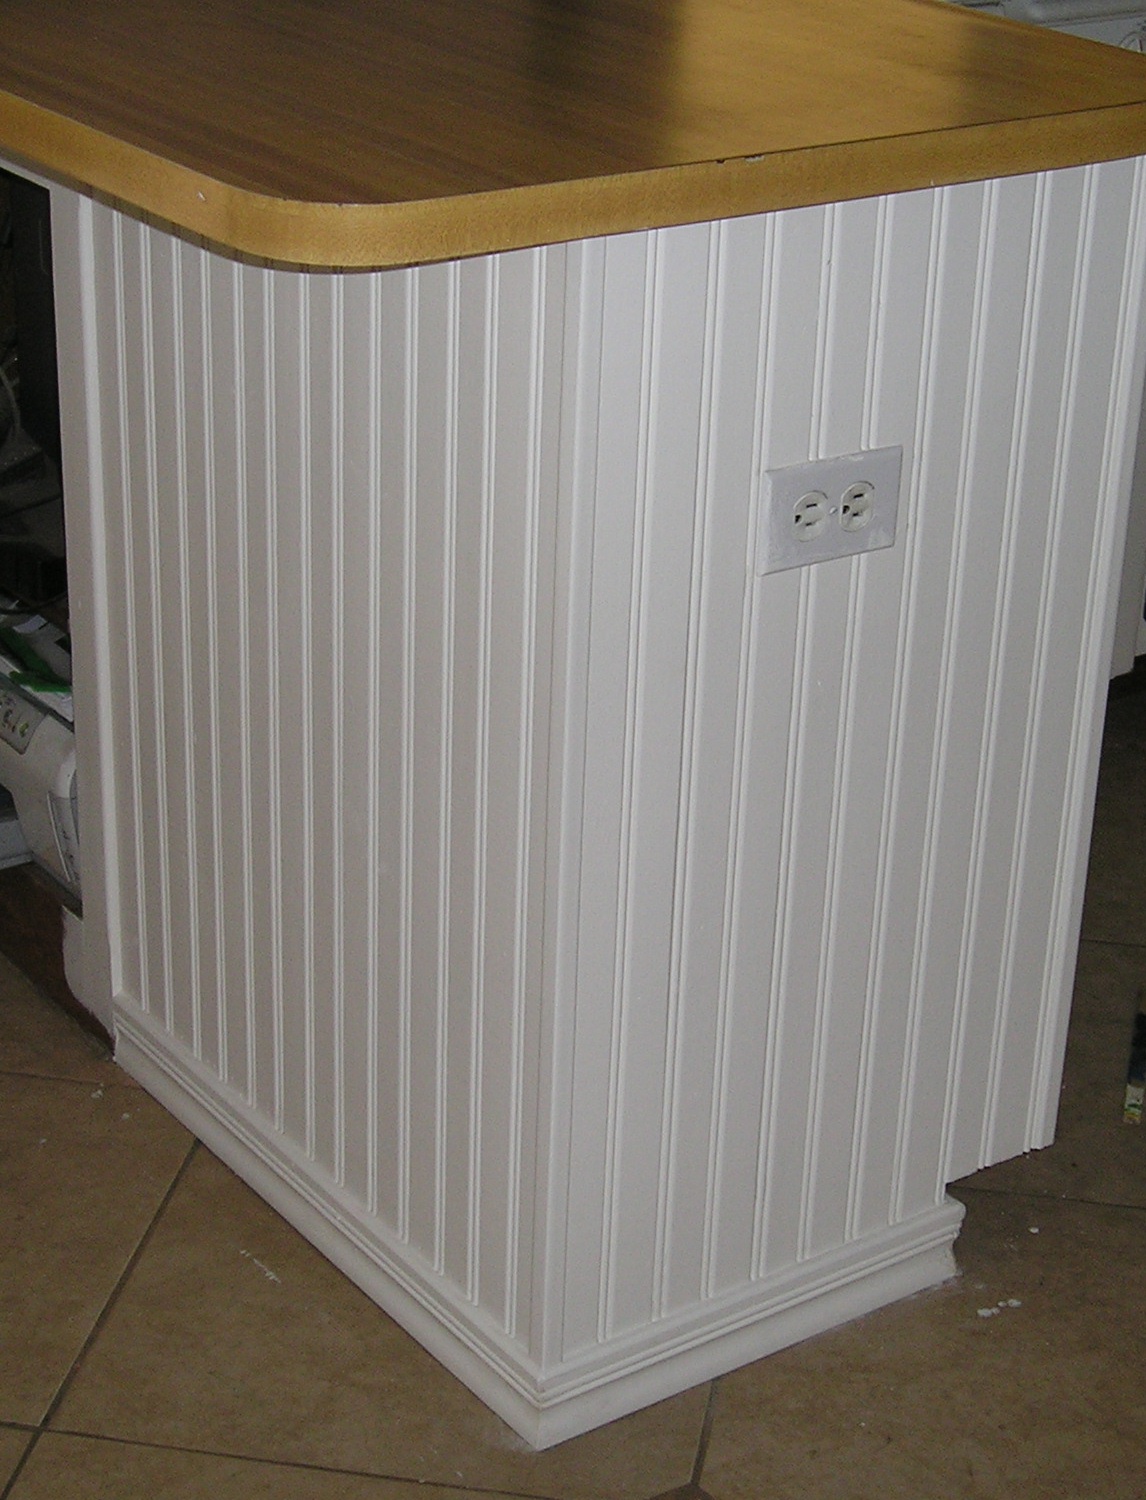
I had a few pieces of bead board left over from my bathroom project and so I decided that I'd install beadboard on the sides of my cabinets. I'm SO GLAD I did! What a difference!

I think the cabinets actually look finished now. And the best part... it was cheap! $20 to install beadboard to the sides and back of 3 cabinets!
Stay tuned!! Tomorrow I'll share my Mother's Day present and the rest of the kitchen makeover!!
Blessedness!
Linda

Tuesday, June 1, 2010

A New Perspective


Four years ago today my husband received a life saving kidney transplant. It was his second transplant in 9 months. The first of which only lasted about 24 hours before his body rejected it and it had to be removed 5 days later. So much has happened in these past four years. A lot of ups and downs, and struggles as we adjusted to life post-transplant. Somedays I find it hard to believe that it's really been four years! God in His mercy and kindness has proven His sovereignty over and over again in and through our circumstance. There was a time that I considered my husband's kidney failure and kidney disease to be the worse thing that could ever happen to our young family. Today I see it as possibly the biggest blessing of our lives. God is good, and He has shown us undeserved mercy and grace. Whether we are blessed with another four years, or forty, each day is a gift, that grows sweeter with time. It was God in His sovereignty that has placed me upon this earth at this time, in this marriage to my Mr. A Garden of Roses, and I know that my life is a tool in the hand of the Redeemer for the glory of Christ and His gospel.
Blessings to you on this day which the Lord has made!
Linda

Saturday, May 29, 2010

New Fabrics have arrived!!


And are they ever gorgeous!! I had a very pleasant surprise yesterday morning when UPS knocked on my door and delivered two GIANT boxes full of beautiful new Durham Fabrics... fresh from Japan!! The fabrics were not actually supposed to arrive for a few weeks yet, so you can imagine my joy when I opened the boxes.
I love Durham fabrics... they are softly colored, laden with roses and are simple GORGEOUS!! I could hardly wait to get them photographed so I could share with everyone! Needless to say, all else I had planned for Friday was put on hold and my fabric took center stage!
I'm slowly but surely getting them uploaded to my stores onetsy and ebay. I thought I'd post a few quick sneak peaks of the lovely new line!
Enjoy your weekend!!
Linda